Complete Guide to Installing Threaded Inserts
Views: 27 Author: Allen Xiao Publish Time: 2025-10-28 Origin: Site


Threaded inserts are versatile fasteners used to create durable, reusable threads in materials that might otherwise strip or wear out, such as wood, plastic, or soft metals. Whether you're working on a DIY project, automotive repair, or industrial assembly, knowing how to install threaded inserts correctly can save time and prevent costly mistakes. This guide covers the essentials of threaded insert installation, including the tools and techniques needed for a secure fit. We'll explore various aspects, from basic steps to specialized equipment, ensuring you have the knowledge to handle different scenarios with confidence. By the end, you'll understand how to choose the right inserts and tools for your specific application, leading to professional-grade results every time.
content:
What in the World is a Threaded Insert?
Getting the Insert in There: You Need a Tool!
How to Install a Threaded Insert: A Simple Step-by-Step Guide
A Special Kind of Insert: For Plastic!
What in the World is a Threaded Insert?
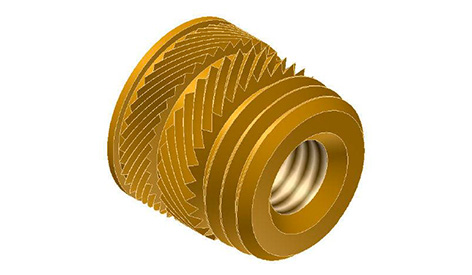
Let's break it down. A threaded insert is a small, metal tube with ridges (threads) on the inside. The outside is designed to grip onto the material you're putting it into, like wood, plastic, or even soft metal.
Why are they so great?
They make a strong hole in soft materials that would normally strip easily.
They let you take things apart and put them back together without wrecking the hole.
They are like a secret weapon for making your projects look professional and last a long time!
Getting the Insert in There: You Need a Tool!
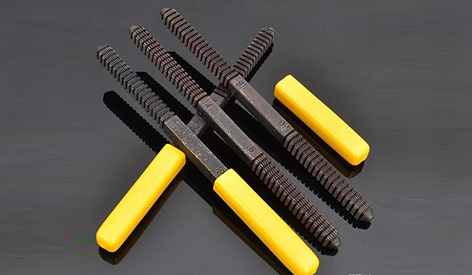
You can't just push a threaded insert into a hole with your fingers. It needs to be placed perfectly straight and pushed in firmly. This is where a thread insert tool comes to the rescue!
A thread insert tool is a special helper designed to do this job. It holds the insert for you and helps you screw it or press it straight into the hole. Using the right tool makes sure the insert goes in evenly and doesn't get crooked.
For someone just starting out, a threaded insert tool kit is the best way to go. A kit is like a complete package—it usually comes with the main tool, plus several different-sized tips (called mandrels) to fit different inserts. It has everything you need in one box, which is perfect for trying out different projects.
How to Install a Threaded Insert: A Simple Step-by-Step Guide
Installing a threaded insert is like a mini-mission. If you follow the steps, you'll have a perfect, strong hole! Here’s how it works:
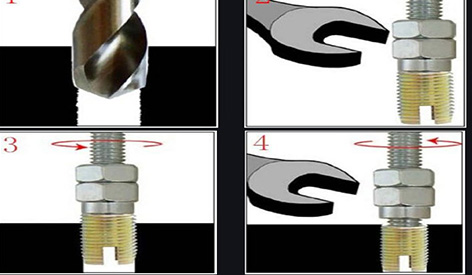
Drill the Pilot Hole: First, you need to drill a starter hole in your material. This hole has to be just the right size—not too big, not too small. It's like the insert's new home. The instructions that come with your inserts will tell you exactly what size drill bit to use.
Get Your Tool Ready: Choose the right tip for your threaded insert installation tool that matches the size of your insert. Screw the insert onto the end of the tool. It should feel snug and secure.
Time to Install! Carefully place the insert at the entrance of the hole you drilled. Now, slowly and firmly, turn the tool or press down (some tools you turn, others you just push). The goal is to get the insert to go all the way in until its top is flat with the surface of your material.
Unscrew the Tool: Once the insert is in place, simply unscrew the tool from the insert. What you’re left with is a clean, professional-looking metal thread ready for your screw!
A Special Kind of Insert: For Plastic!
Working with plastic can be tricky because it can melt or crack. That's why there are special threaded inserts for plastic. These often have little grooves or bumps on the outside that help them dig into the plastic and hold on tight. Sometimes, you use a little bit of heat to soften the plastic just enough to slide the insert in smoothly. This makes a super strong connection without breaking the plastic.
Mastering the installation of threaded inserts opens up opportunities for stronger, more reliable assemblies in various materials. By understanding the nuances of threaded insert installation and leveraging tools like a thread insert tool or a comprehensive threaded insert tool kit, you can tackle projects with greater confidence. Remember to choose the right threaded insert installation tool for your needs and pay special attention when working with threaded inserts for plastic to avoid material failure. Threaded inserts, in general, offer a robust solution for enhancing thread durability, making them indispensable in both professional and DIY settings.


ㆍPrivacy: We respect your privacy. Here you can find an example of a non-disclosure agreement. By submitting this form, you agree to our terms & conditions and privacy policy.