Mastering 3D Printing Tolerances for Precision Manufacturing
Views: 1 Author: Allen Xiao Publish Time: 2025-09-01 Origin: Site
Have you ever designed something awesome on a computer, 3D printed it, and then noticed it wasn't quite perfect? Maybe a part ended up a fraction of a millimeter too wide or too narrow?
That's all about something called tolerances. Don't let that technical term intimidate you!
This simple yet crucial concept explains why printed objects don't always match their digital designs perfectly.
Imagine you're baking cookies. Even if you use the same cookie cutter every time, each cookie will be slightly different. Some might spread a little more in the oven, while others might stay a bit puffier.
3D printing tolerances work exactly like this! They represent those expected, tiny differences between your perfect digital design and the real-world printed object.
The printer always does its best, but occasionally a 10mm block might measure 9.8mm or 10.2mm instead. And that's completely normal in the world of 3D printing!
Think of tolerance as a "perfectly expected mistake." It's the amount of "oops" the printer is allowed to have while still producing a great print.
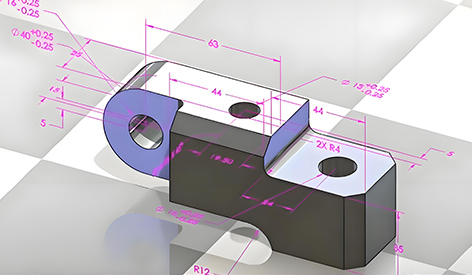
Engineers express this using the ± symbol. For example, a tolerance of ±0.2 mm means your printed object can measure 0.2 millimeters larger or smaller than designed and still work perfectly.
So if you design a 10 mm peg, your printer can successfully create one measuring between 9.8 mm and 10.2 mm!
Making Pieces That Fit Together: 3D Printing Fit Tolerances
3D printing fit tolerances focus on creating parts that connect with each other. Think about your shoes. Your foot needs to fit inside, but it shouldn't be so tight that it's uncomfortable or so loose that it falls off.
A clearance fit is like your foot in a loose slipper—there's plenty of room to slide in and out.
An interference fit (or press-fit) is like jamming your foot into a boot that's a size too small. This tight fit creates a powerful, secure hold.
A transition fit is snug, like a perfect shoe. It might need a little push to get on.
When you design parts that snap together, you have to plan for these tiny size differences.
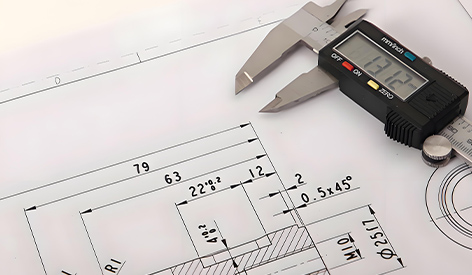
How Do We Measure These Tiny Differences? (3D Printing Tolerances MM)
We measure these incredibly small variations in millimeters (mm). To understand the scale, a single millimeter is roughly the thickness of a standard credit card.
When we specify 3D printing tolerances mm, we're defining the acceptable range of difference. A common standard for many desktop printers is approximately ±0.5 mm. That's about the width of the tip on a sharp pencil!
These precision machines achieve incredible accuracy, working within tolerances of just ±0.1 mm. That's thinner than a human hair! For comparison, it's about the size of a tiny ant egg.
Why the Printer and Plastic Matter: FDM 3D Printing Tolerances & ABS Tolerances
The most common type of printer (FDM) works like a super-precise hot glue gun. It squeezes out melted plastic layer by layer. Because it's dealing with hot, gooey plastic that cools and shrinks, it's hard to be perfect. FDM 3D printing tolerances are usually a bit looser.
Different printing materials behave uniquely. ABS plastic—the same durable material used in LEGO bricks—tends to shrink and warp significantly as it cools.
This natural shrinking makes achieving consistent dimensions more challenging. Therefore, 3D printing ABS tolerances must accommodate this extra contraction.
Think of it like working with cookie dough that you know will spread—you naturally space the dough lumps farther apart on the baking sheet to compensate!
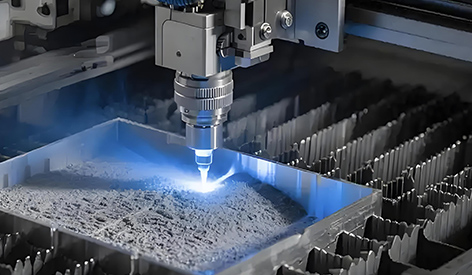
Super Strong Metal Printing: 3D Metal Printing Tolerances
Yes, you can 3D print metal! It uses lasers to melt metal powder together. It's amazing, but the metal gets super hot and can warp as it cools, just like a piece of paper curls when you hold it near a lightbulb. 3D metal printing tolerances are usually very tight (like ±0.1 mm), but engineers have to be super clever to control the heat and prevent warping for parts like rocket engines or medical implants.
The Problem with Holes: 3D Printing Tolerances for Holes
Holes are famous for printing too small. Why? Imagine drawing a circle with a thick marker instead of a thin pencil. The hole gets filled in a little. That's what happens with 3D printing. The melted plastic tends to sag inward, making holes smaller. So, for 3D printing tolerances for holes, designers often make the hole in their design a little bigger (like adding an extra 0.2 mm) so that it prints at the exact size they want.
How You Can Design for Success: 3D Printing Design Tolerances
You can be a smart designer too! Using 3D printing design tolerances means making your designs friendlier for the printer.
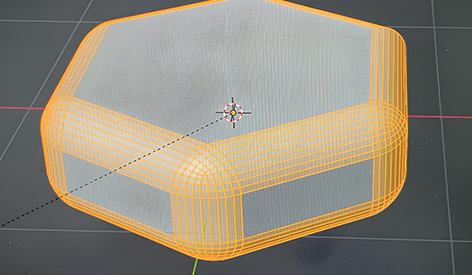
Add slanted edges (chamfers) to help parts slide into place.
Don't expect things to be perfectly sharp; they'll usually be a tiny bit rounded.
Remember that your printer might have its own personality and tiny quirks!
How to Get the Best Results: 3D Printing Best Tolerances
So, what are the 3D printing best tolerances? It's not one magic number. It's about getting the most consistent results from your printer. To get the best your machine can offer, you need to:
Calibrate it: Make sure all its belts are tight and it's extruding the right amount of plastic.
Print Slower: Going slower gives the printer more time to be accurate.
Use Good Materials: Cheap plastic can have bumps and thickness changes that ruin precision.
The "best" tolerance is one you can count on every time you print!
Related Articles
content is empty!
Categories
Request Your DFM & Quote – Upload Your Drawings
ㆍFill in your requirements and upload your 2D&3D file, we will feedback your project quotation and DFM within 24 hours.
ㆍFile types: STEP, STP, IGES, IGS, SLDPRT, 3DM, SAT or X_T files File size: < 128 MB Part size: < 1500*1500*1500 mm ㆍPrivacy: We respect your privacy. Here you can find an example of a non-disclosure agreement. By submitting this form, you agree to our terms & conditions and privacy policy.